

DIY Wine Tote - 3 Ways

I would say that wine is generally always a well received gift for pretty much any host or hostess, especially during the holiday season when everything is a hot mess. Now, add a fun, personalized wine tote to the mix and you're majorly in the rocking gift giving business. This blog post is going to be all about adding a little oomph to the wine giving process with wine totes three ways! Let's get to it! Felted Wine Quote Tote (mmhmm, I just rhymed that)
Here's what you'll need:
- Felt Wine Tote - I got mine in the See Spot Save section at Target
- 2 Sheets NuFun Activities Dark Fabric Transfer Paper
- Weeding Mask
- Cutting Machine
- Iron
- Parchment Paper
- Scissors
- Using your cutting machine, load quote and cut on the plain white sheet of dark transfer. This will create a crisp white transfer.

- Weed the excess transfer carefully from the quote letters. The transfer will weed easily but you'll still want to watch that the letters don't peel up with the rest of the transfer. Use an exacto knife to remove the excess from the insides of the letters.

- Place weeding mask over entire quote and be sure to press out any air bubbles. Peel quote from backing paper using the weeding mask.
- Place weeding mask centered on the felt wine tote and cover with parchment paper.

- Iron transfer according to the instructions and let cool.
- Remove parchment paper and weeding mask after transfer and wine tote have cooled completely.
- While you're at it, maybe add an monogram to the back side! All it takes is cutting a letter on your cutting machine and transferring just like you did the quote!


Here's what you'll need:
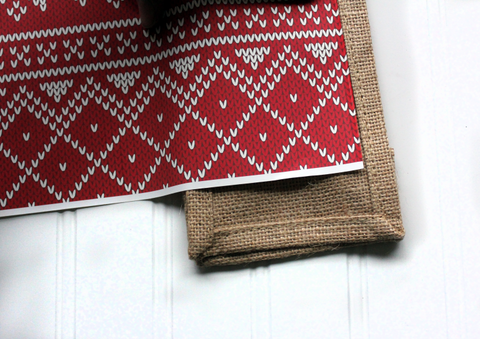
- Burlap Wine Tote - I found these on Amazon and they worked well but if I could do it over again, I would get some with smaller side seams!
- 2 Sheets NuFun Activities Dark Fabric Transfer Paper
- Scissors
- Printer
- Parchment paper
- Iron
- First, print 2 sheets your cozy sweater pattern on transfer paper. I got mine from Nerdy Mama.com!
- Cut the transfer paper to fit on all four of the sides of the wine tote. If your wine tote has side seams like mine, be sure to cut the transfer pieces to fit INSIDE the seams.
- Peel the backing paper from the transfer and place on the middle of the first side of the wine tote. Cover with transfer paper.
- Iron according to the instructions and allow to cool. Peel parchment paper.
- Repeat for three remaining sides. Be sure to covered any previously transferred sections with parchment paper. For example. when transferring to the back side, lay a piece of parchment paper down so that the previous transfer does not get damaged.


Here's what you'll need:
- Canvas wine tote -I got these on Amazon as well.
- 1 sheet NuFun Activities Light Fabric Transfer Paper
- Printer
- Scissors
- Iron
- Prep your graphic to print. This can be done easily in Microsoft Word or similar! Then mirror or flip your graphic before printing!
- Print your graphic on the unlined side of the paper.
- Cut around graphic to fit inside the seams of the wine tote.

- Place printed side down on the wine tote and iron according to the instructions. The seams of the tote can interfere with the transfer, so be very careful to get into the corners by the seams.
- Peel the backing paper while the transfer is still hot! As I said, the seams may cause some issues so if the backing paper does not peel smoothly in certain areas, continue to iron these until they do peel easily.
Finally, fill up your wine totes with your favorite vino and enjoy the gift of giving! And hey, maybe you're not into wine, there are plenty of pretty and delicious wine shaped beverage bottles that will be just as adorable inside one of these cute totes!
Find all these awesome NuFun Activities products and more online exclusively on our shop
